In professional product photography, lighting is not just a technical setup — it is the defining factor that determines how a product appears to customers. One of the most critical distinctions photographers must understand is the difference between shooting matte products and glossy products.
Although both may look appealing in person, they behave very differently under studio lights. The lighting techniques required for matte finishes differ completely from those used for reflective or glossy surfaces. Failing to adjust the lighting setup can result in dull images, harsh reflections, glare, or loss of product detail.
Understanding these differences is essential for high-quality e-commerce product photography, commercial shoots, and brand campaigns.
Understanding Matte vs Glossy Surfaces
Before diving into lighting techniques, it’s important to understand how these surfaces interact with light.
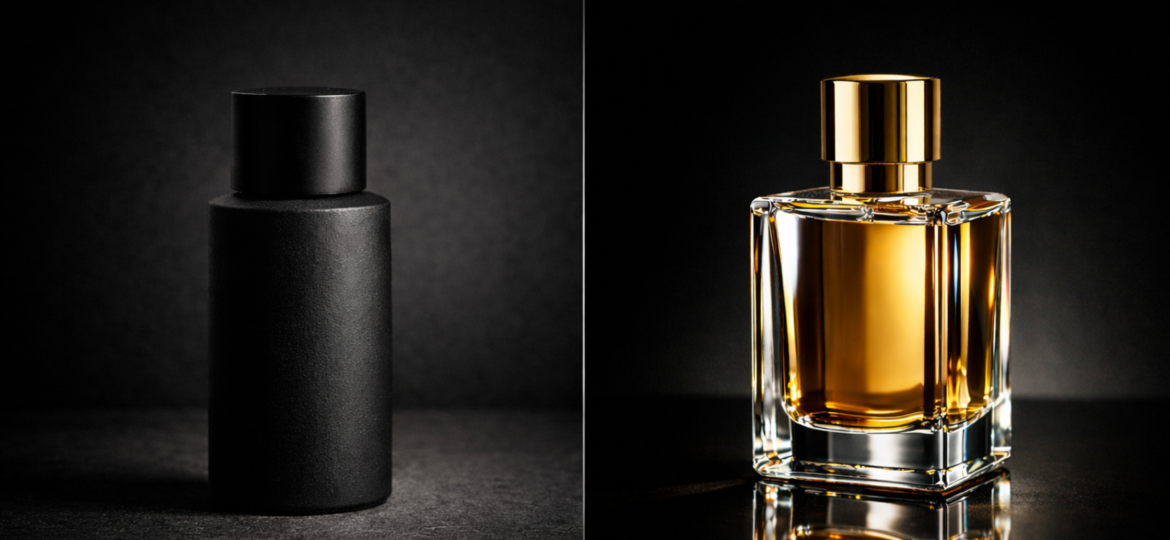
In professional product photography, surface finish plays a crucial role in determining the ideal lighting setup. Matte products diffuse light and minimize reflections, while glossy or reflective surfaces create sharp highlights and mirror-like reflections under studio lights. This difference significantly impacts exposure control, highlight management, and overall image clarity. Whether shooting for e-commerce product photography, commercial catalog photography, or Amazon listings, understanding light absorption versus light reflection helps ensure accurate texture capture and a premium visual presentation.
What Are Matte Products?
Matte products have a non-reflective, soft finish. They absorb more light and scatter it evenly rather than reflecting it directly.
Examples include:
💄 Matte cosmetic packaging 🧵 Fabric products 👞 Leather goods 🪵 Wooden items 📱 Matte-finish gadgetsMatte surfaces are generally easier to shoot but require careful lighting to avoid flatness.
What Are Glossy Products?
Glossy products have a shiny, reflective surface that mirrors light sources and surrounding objects.
Examples include:
🧴 Glass bottles 🌸 Perfume packaging 💻 Electronics with polished surfaces 🪙 Metallic products 📦 Plastic packaging
Why Lighting Needs to Be Different
Lighting directly affects texture, shape, and depth. Since matte and glossy products respond differently to light, they require different lighting setups to achieve professional results.
Lighting Techniques for Matte Products
1. Use Directional Lighting for Depth
Because matte surfaces don’t reflect light strongly, they can appear flat in images. To avoid this:
💡 Use side lighting to create shadows ✨ Add subtle rim lighting to define edges 🎯 Adjust angles to highlight textureDirectional lighting helps create dimension and shape.
2. Avoid Over-Diffusion
While soft light is beneficial, excessive diffusion can make matte products look lifeless.
Best practices include:
📦 Moderate softbox usage ⚖️ Balanced contrast ✨ Maintaining controlled highlightsThe goal is to enhance texture without eliminating depth.
3. Highlight Texture Carefully
In commercial product photography, texture sells the product. For example:
🧵 Fabric grain 👞 Leather patterns 💄 Powder finishesUsing angled lighting enhances surface texture without creating glare.
Lighting Techniques for Glossy Products
Glossy products require an entirely different approach because they reflect everything — including lights, camera, and background.
1. Control Reflections with Diffused Light
Hard light creates harsh reflections on glossy surfaces. Instead:
💡 Use large softboxes ⛺ Employ light tents 🌫️ Use diffusers to soften highlightsDiffused lighting helps manage reflections while maintaining shine.
2. Use Reflection Panels and Flags
Professional product photographers use:
🏴 Black flags to absorb unwanted reflections ⬜ White foam boards to control highlight placement 🔁 Reflectors to shape light intentionallyThis technique is critical in glass product photography and cosmetic product photography.
3. Adjust Light Angles Strategically
For glossy products, light placement is everything.
Instead of pointing the light directly at the product:
This ensures clean reflections rather than distracting glare.
4. Polarizing Filters for Glare Reduction
A circular polarizing filter can reduce unwanted reflections, especially in:
🧴 Glass bottles 💻 Electronics 🪙 Polished metal productsCommon Mistakes in Matte and Glossy Product Photography
For Matte Products:
🌫️ Over-softening light 🌑 Underexposing texture 🕶️ Ignoring shadow depthFor Glossy Products:
⚠️ Allowing uncontrolled reflections 💡 Shooting without diffusion 🪞 Ignoring background reflectionsThese mistakes reduce product appeal and negatively impact conversion rates.
Why This Matters in E-Commerce Product Photography
Online buyers cannot touch or feel a product. Lighting determines:
⭐ Perceived quality 🔍 Texture clarity 💎 Premium feel 🤝 Brand trustPoor lighting can make high-quality products look cheap, while professional lighting enhances brand perception.
In Amazon product photography, Shopify product listings, and brand websites, proper lighting directly influences click-through rates and conversions.
The Role of Professional Studio Setup
In professional product photography studios, lighting is customized based on product type.
For Matte Products:
🎯 Controlled directional lighting ✨ Texture-enhancing highlights 🌗 Soft but defined shadowsFor Glossy Products:
💡 Large diffused light sources 🛠️ Reflection management tools 🎯 Strategic highlight placementProfessional photographers test multiple lighting setups before finalizing the frame.
Post-Production Considerations
Lighting does most of the work, but post-processing also differs.
Matte Product Editing:
🔍 Enhance texture clarity 🌗 Improve depth ⚖️ Adjust contrast subtlyGlossy Product Editing:
🪞 Clean reflections 🧼 Remove dust or glare spots ✨ Refine highlight balanceHowever, proper lighting minimizes the need for excessive retouching.
Choosing the Right Lighting Setup for Your Product
When planning a product shoot, ask:
🪞 Is the surface reflective? 🔍 Does the product rely on texture? ⚠️ Is glare likely to occur? 🎨 What mood should the image convey?